Design and Construction of Incubator\Egg Hatcher at Home
Introduction
In this project we design and construct an incubator .An incubator is a machine which is use for hatching a chicken eggs. This incubator can almost hatch all kinds of bird eggs.This idea is also useful for infant incubator in the medical field. In infant incubator we need to control few more parameters.
There are a lots of
application of incubator project in industries .
Problem
statement
If we don’t use
incubator technology. Then it
will affect all the food industries. Chickens
are one of the most used food
item in the world.
Normally the natural Way of Eggs hatching rate are very low while in incubator
technology the rate of hatching are very high .We can produce a lots
of healthy chicks with the help of
incubator without any problems.
Objectives :
In this project we will be design
and construct an incubator. For incubator project
few parameters are needs to be control. These parameter are like a mother chicken give to there eggs to hatch them .First of
all we need an insulated box for that we need a rectangular type metal frame and all the sides of which are cover with a
glass .Inside of this box we need to control few parameters. we need to control
temperature for which we need a temperature sensor. A humidity sensor is used
to control humidity. For Air circulation we need a small Fan. We also need a
heater to maintain the incubator temperature.
We are Using Arduino uno to control all these sensors and all the
Circuits of the incubator.
Egg turner is also very important to prevent the eggs
mortality. For egg turner a large container
tray is needed to hold the eggs .the egg turner is further connected to
the DC gear motor which control its turning after every eight
hours.
Temperature: The eggs
need to be kept at 99.5 degrees at all times; just one degree higher or lower
for a few hours can terminate the embryo.
Humidity: 40 to 50
percent humidity must be maintained for the first 18 days; 65 to 75 percent
humidity is needed for the final days before hatching.
Ventilation: Egg
shells are porous, allowing oxygen to enter and carbon dioxide to exit;
incubators need to have holes or vents that allow fresh air to circulate so the
fetuses can breathe.
Scope
of my project
We can use Incubator project in both domestic and industrial
levels.
The system worked according to
specification and proved quite satisfactory. It is relatively affordable,
durable and efficient. Hence, give room for ease of operation and high level of
reliability.
General
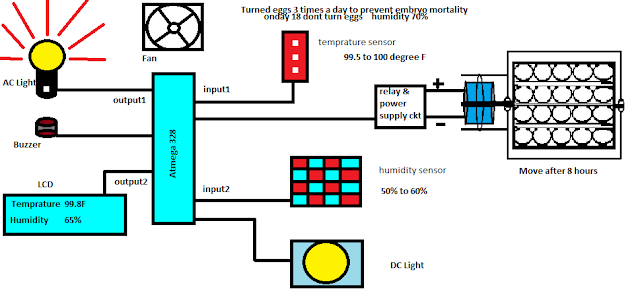
block diagram
Components
used in this project.
•
Electrical and Electronic
Equipment’s
• Temperature
and humidity sensor KY-015
• Temperature Sensor LM35
•
LCD
•
Buzzer
•
Heater
•
AC
Light
•
DC
Light
•
Arduino
Microcontroller
•
Relays
•
DC
Gear Motor
•
Diodes
•
Vero
board
•
Soldering
wire
•
Transistors
•
ULN
2803(IC)
•
Bread
board
•
Jumper
wires
•
Bridge
rectifies
•
Polar
capacitors
•
Lm7805
voltage regulator
•
Transformer
12volts output
•
LED,s
•
Resistors
Sketch
:
#include <LiquidCrystal.h>
int sensorValue = 0;
int analogPin = 0; // Temprature
sensor pin
int readValue = 0;
byte r; //
serial control
float temperature = 0;
float temperatureF = 0;
int Motorleft = 9; // DC MOTOR pin
int Motorright =10;
unsigned long previousTime = 0;
int comp = 1;
long interval = 28800000; //28800000 = 8 hours ,
1000msec=1sec Motor delay egg turning
LiquidCrystal lcd(12, 11, 5, 4, 3, 2);
int fan = 6; //DC Fan
int DHpin = 8; // TEMPERATURE
AND HUMIDITY SENSOR pin
int bulb=7; // Bulb pin
int tempc;
int tempcd;
int tempf;
int tempfd;
byte dat[5];
byte read_data()
{
byte data;
for(int i=0; i<8; i++)
{ if(digitalRead(DHpin) == LOW)
{ while(digitalRead(DHpin) == LOW);
delayMicroseconds(30);
if(digitalRead(DHpin) == HIGH)
data |= (1<<(7-i));
while(digitalRead(DHpin) ==
HIGH);
}
}
return data;
}
void start_test()
{
digitalWrite(DHpin,LOW);
delay(30);
digitalWrite(DHpin,HIGH);
delayMicroseconds(40);
pinMode(DHpin,INPUT);
while(digitalRead(DHpin) == HIGH);
delayMicroseconds(80);
if(digitalRead(DHpin) == LOW);
delayMicroseconds(80);
for(int i=0;i<4;i++)
dat[i] = read_data();
pinMode(DHpin,OUTPUT);
digitalWrite(DHpin,HIGH);
int a,b;
}
void setup()
{
pinMode(fan, OUTPUT);
digitalWrite(fan, LOW);
pinMode(Motorleft, OUTPUT); //Motor OUTPUT
digitalWrite(Motorleft, LOW);
pinMode(Motorright, OUTPUT);
digitalWrite(Motorright, LOW);
lcd.begin(16, 2);
pinMode(bulb, OUTPUT); //BULB output
pinMode(DHpin,OUTPUT);
Serial.begin(9600);
}
void loop()
{ readValue = analogRead(analogPin);
temperature = (readValue * 0.0049);
temperature = temperature * 100;
temperatureF = (temperature * 1.8) + 32;
delay(1000);
//lcd.clear();
lcd.setCursor(0,0);
lcd.print("TP ");
lcd.print(temperature);
lcd.print("C ");
lcd.print(temperatureF);
lcd.print('F');
start_test();
lcd.setCursor(0,2);
lcd.print("HUMIDITY ");
lcd.print(dat[0],DEC);
lcd.print('.');
lcd.print(dat[1],DEC);
lcd.print('%');
// tempc =(dat[2]);
// tempf = (tempc * 9)/ 5 +
32; // convert c to f
// tempcd =(dat[3]);
// tempfd = (tempcd * 9)/ 5 +
32; // convert c to f
if ( temperatureF >= 102) //
check temp to on or off bulb
{ digitalWrite(bulb, LOW);
digitalWrite(fan, LOW);
}
else
{ digitalWrite(bulb,HIGH);
digitalWrite(fan, HIGH);
}
if ( temperatureF <= 98) // check
temp to on or off bulb
{ digitalWrite(bulb, HIGH);
digitalWrite(fan, HIGH);
}
else
{ digitalWrite(bulb,LOW);
digitalWrite(fan, LOW);
}
delay(100);
unsigned long currentTime = millis(); // store the time since
the Arduino started running in a variable
if(currentTime - previousTime >
interval) // if it is
greater than your interval, run the if statement // compare the current time to
the previous time an LED turned on
{
previousTime = currentTime;
switch (comp)
{
case 1:
digitalWrite(Motorleft, HIGH);
delay(2400);
digitalWrite(Motorleft, LOW);
comp = 2;
break;
case 2:
digitalWrite(Motorright,
HIGH);
delay(2400);
digitalWrite(Motorright, LOW);
comp = 1;
break;
}
}
}
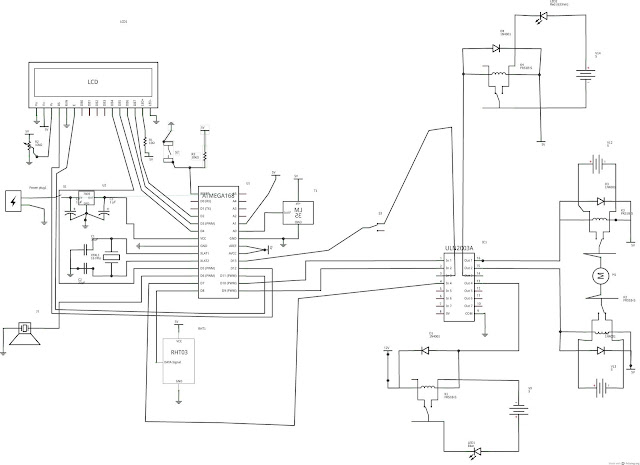
Circuit Daigram:
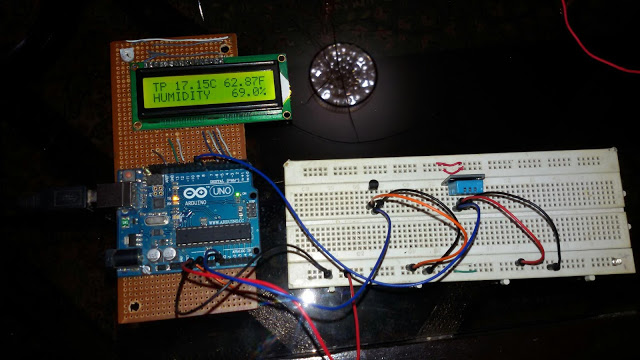
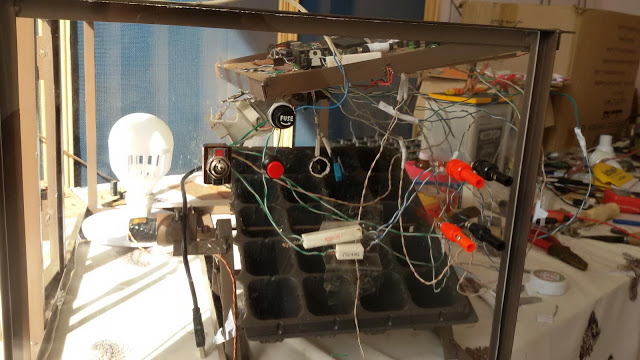
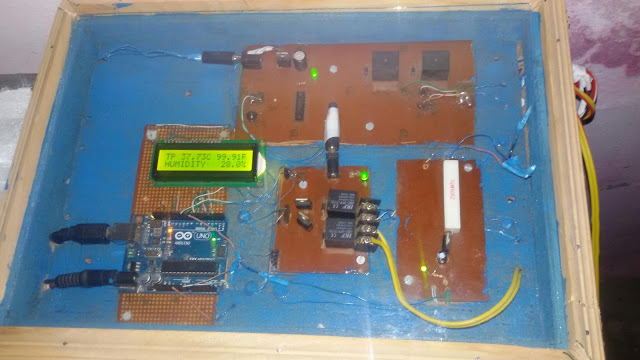
Projects images:
For Video visit my youtube channel
Follow me on
Twitter : https://twitter.com/MohsinH73145168






Thanks for sharing your research with us.
ReplyDeleteplaese are you have schema elctrique
ReplyDeleteenvoie with e-mail
Sorry did,t get u clearly?
DeleteCan u make directly through arduino uno or mega code controller for me.
ReplyDelete